
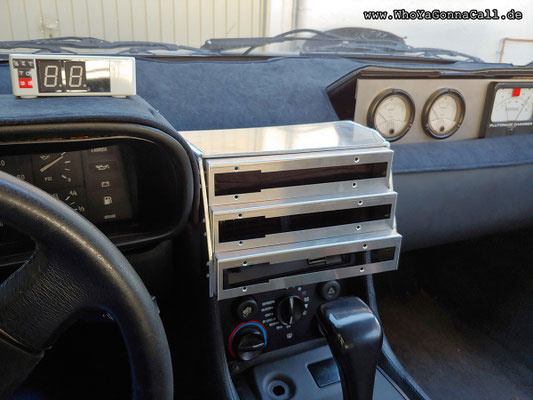
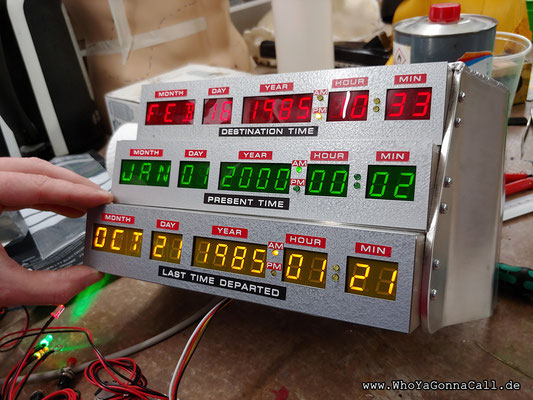
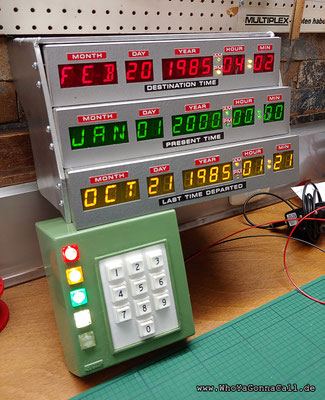
Time Circuit Display

Das zweite, neben dem Flux Kompensator, zentrale Element in der Zeitmaschine ist die sogenannte Zeitleiste oder in englisch Time Circuit Display. Kurz TCD.
Da wir nicht über die nötigen Programmier-Fähigkeiten verfügten, mussten wir uns für die Elektronik Hilfe suchen.
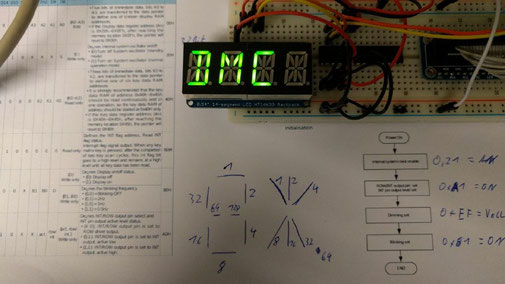
Zunächst programmierte unser Freund Sven S. die ersten Tests für die Displays.
Wir mussten aber schnell feststellen, dass die Herstellung der 3 Displays professionell gefertigte Platinen erfordern würde. So würde das Projekt sehr schnell recht hohe Kosten erzeugen.
Hier ein Foto und zwei Testvideos vom Oktober 2017:

The second, next to the flux capacitor, central element in the time machine is the so-called Time Circuit Display. Short TCD.
Since we did not have the necessary programming skills, we had to look for help for the electronics.
First our friend Sven S. programmed the initial tests for the displays.
But we soon realized that the production of the 3 displays would require professionally manufactured circuit boards. So the project would generate quite high costs very quickly.
Here one picture and two videos fom october 2017:


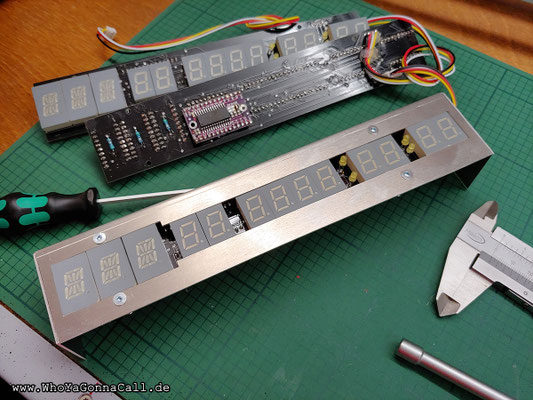
Glücklicherweise konnte Kathy (shinzo) im Internet ein Team von französischen Zurück in die Zukunft Fans finden, die uns mit genau diesen Teilen, ja sogar der vollständigen Elektronik aushelfen konnten.
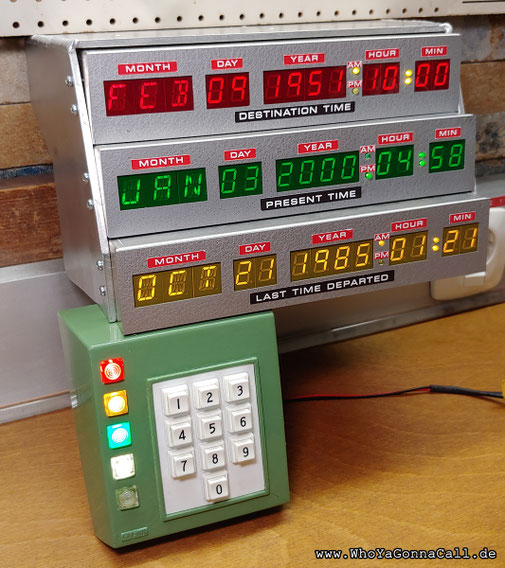
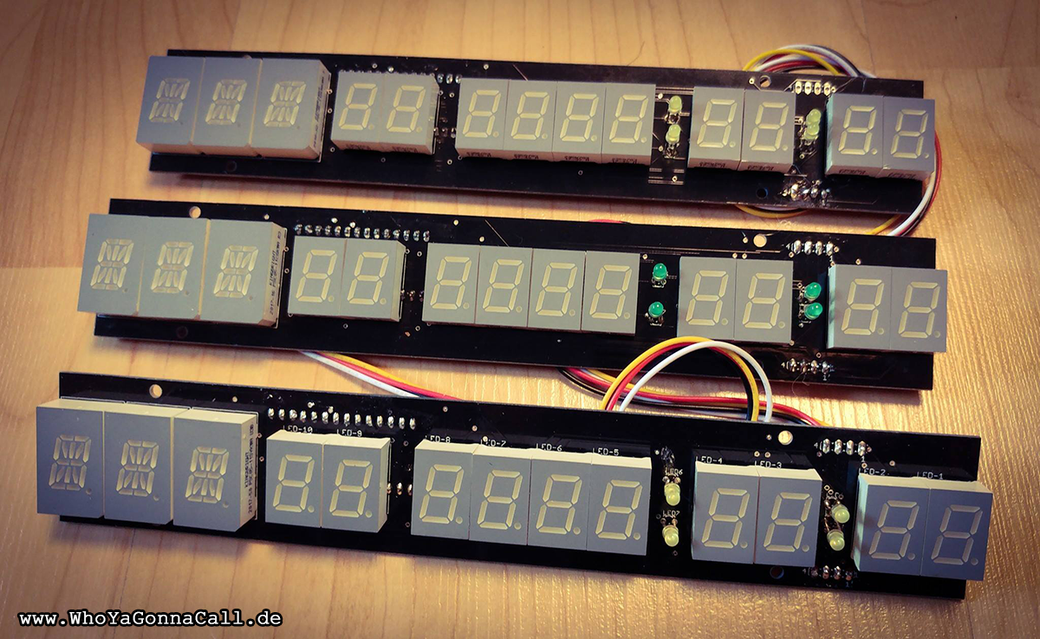
Im Mai 2018 haben wir die Elektronik von Timecircuit gekauft.
Diese beinhaltet diese drei Displays in entsprechender Farbe und Detailgenauigkeit.

Fortunately, Kathy was able to find a team of French Back to the Future fans on the Internet who could help us out with exactly these parts, and even the complete
electronics.
In May 2018 we've bought electronics from Timecircuit.
These includes three displays in right color and best details.

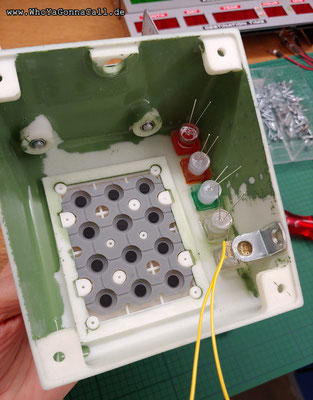
Nun musste "nur" noch ein Gehäuse und ein Tastenfeld gebaut werden.
Dazu recherchierten wir recht lange sowohl im Internet als auch in unserem eigenen Foto-Archiv.
2019 besuchten wir nämlich das Petersen Automotive-Museum in Los Angeles und machten zahlreiche Fotos von der dort ausgestellten original Zeitmaschine.
Basierend auf diesen Fotos bauten wir zunächst einen Dummy des Gehäuses aus PVC-Platten.
Als diese dann passten, nutzen wir das Test-Modell als Schablone.
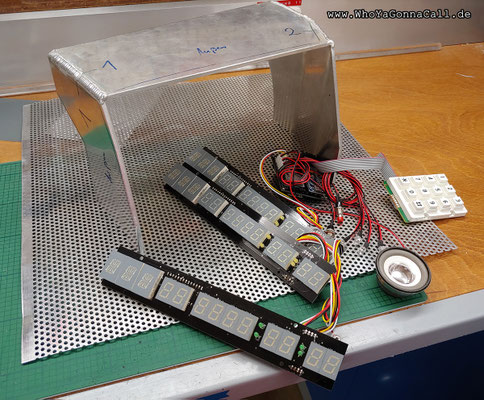
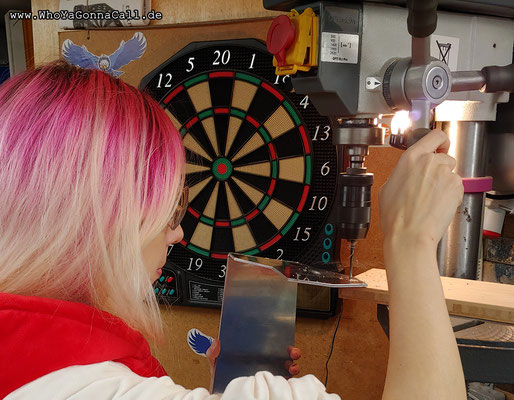
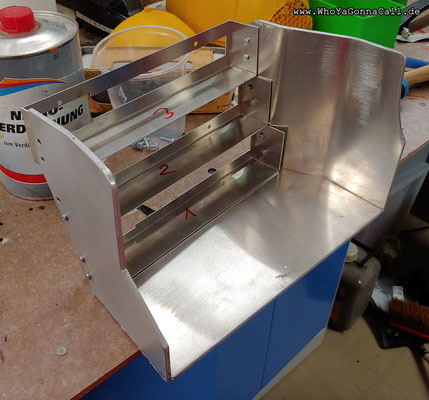
Markus (modellbaubert) sägte, feilte und bog die Alu Bleche dann in Form. Sein Kollege Andreas schweißte sie ihm dann passend zusammen.
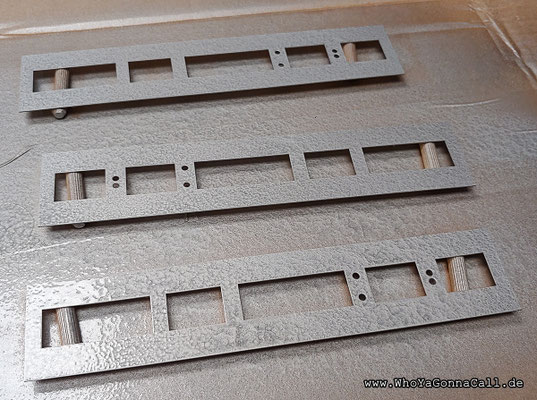
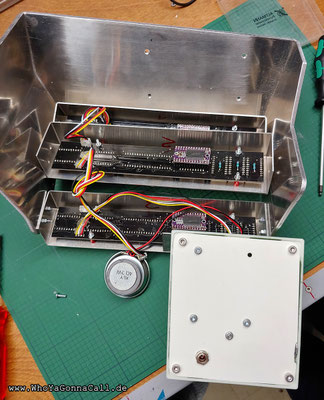
Die 3 eingesetzten Gehäuse und die Blenden konstruierte Markus (modellbaubert) dann im CAD-System exakt passend zu den Display-Platinen und dem selbstgebauten Gehäuse.
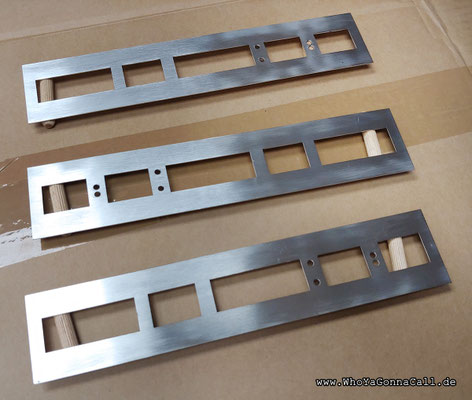
Die CAD-Files wurden dann an ein Blechverarbeiter gegeben, welcher sie aus dünnem Alublech auslaserte.
Gemeinsam fügten wir dann diesen selbstgebauten "Bausatz" zusammen. Es mussten noch die seitlichen Bohrungen + Schrauben an exakt die richtigen Stellen gesetzt werden und die Platinen montiert
werden.

Now "only" a housing and a keypad had to be built.
For this we researched quite a long time both on the Internet and in our own photo archive.
In 2019, we visited the Petersen Automotive Museum in Los Angeles and took a lot of photos of the original time machine on display there.
Based on these photos, we first built a dummy of the enclosure out of PVC panels.
When these fit, we used the test model as a template.
Markus (modellbaubert) then sawed, filed and bent the aluminum sheets into shape. His colleague Andreas then welded them together.
Markus (modellbaubert) then designed the 3 inserted housings and the panels with a CAD system to exactly match the display boards and the self-built housing.
The CAD files were then given to a sheet metal fabricator who laser cut them out of thin aluminum sheet.
Together, we then assembled this homemade "kit". We still had to drill the side holes + fit in the screws in exactly the right places and mount the boards.
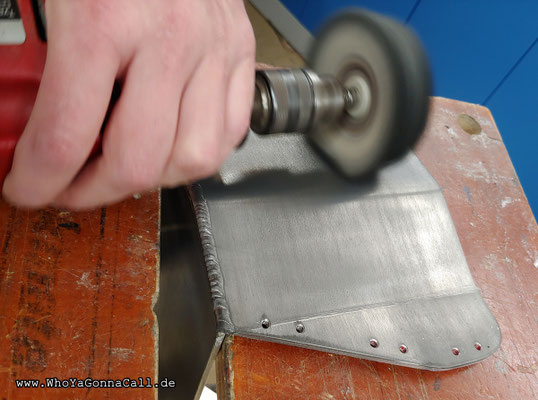

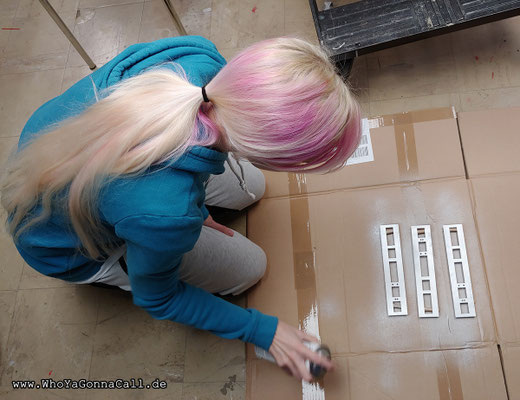
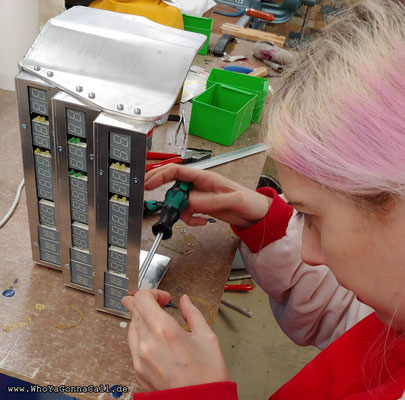
Die Blenden haben wir aus dünnem Edelstahlblech auslasern lassen. Nachdem wir sie geschliffen hatten, sahen sie traumhaft aus. Wie die Außenhaut des DeLorean.
Leider waren die Blenden im Film mit silbernem Hammerschlag-Lack lackiert. Also mussten wir das natürlich auch tun. Eine Schande ;-)
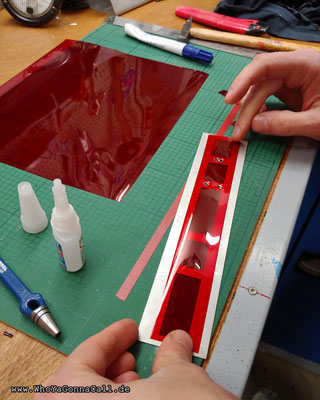
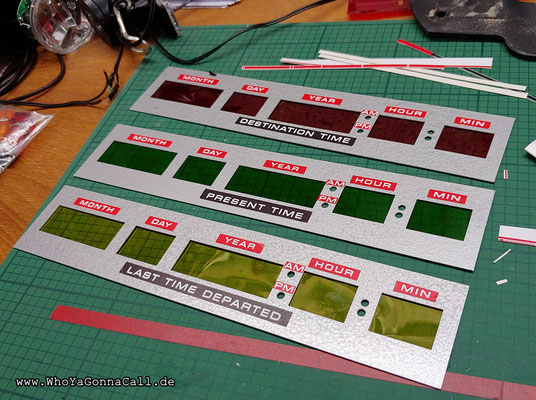
Hinter den Aussparungen für die LED-Displays befanden sich im Film farbige Folien.
Dazu nutzten wir Folien aus der Licht-Technik.
Zum Schluss schnitt Kathy (shinzo) noch die winzigen Beschriftungsfelder aus und klebte sie in geduldiger Feinarbeit an die richtigen Stellen.

We had the bezels laser cut out of thin stainless steel sheet. After we sanded them, they looked fantastic. Like the outer skin of the DeLorean.
Unfortunately, in the film, the fascias were painted with silver hammer finish paint. So, of course, we had to do the same. A shame ;-)
Behind the cutouts for the LED displays, there were colored foils in the movie.
For this we used foils from the lighting technology.
Finally, Kathy (shinzo) cut out the tiny labeling fields and patiently stuck them in the right places.


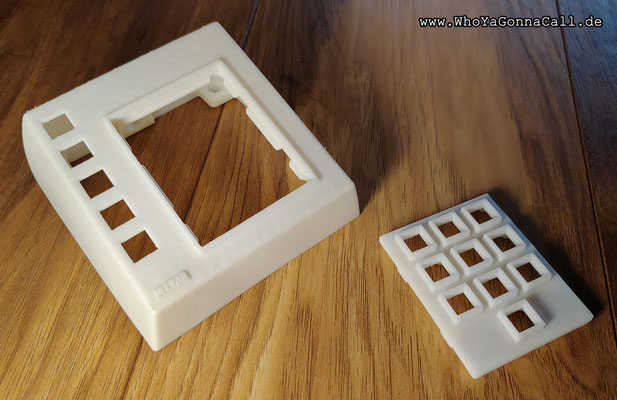
Das Bedienfeld war nochmal eine besondere Herausforderung.
Im Original handelte es sich dabei um die Tastatur einer TRW Alarmanlage. Heute eigentlich nicht mehr zu finden.
Was man aber findet, sind sehr gute Referenzfotos.
Darauf basierend konstruierte Markus (modellbaubert) ein mehrteiliges CAD-Modell des Gehäuses, welches über viele Wochen hinweg immer wieder verfeinert wurde, bis es schließlich
passte.
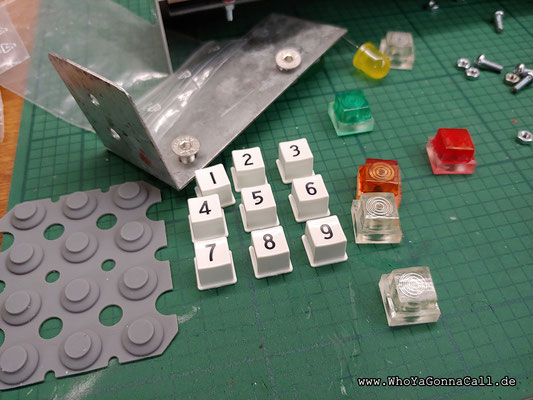
Ein weiteres Problem waren die farbigen Tasten. Auch diese waren nicht zu beschaffen. Also haben wir auch hierzu CAD-Modelle angefertigt.
Unsere Freunde Janos und Johannes druckten die Teile dann für uns auf einem Resin-Drucker aus.
Die Drucke sind toll! Selbst feinste Details wurden abgebildet.
Wir haben das Ganze dann noch etwas nass angeschliffen und mit der entsprechenden Farbe lackiert.
Natürlich gab es keine passende Sprühlack-Dose, also haben wir uns die Farbe anmischen lassen, etwas verdünnt und mit der Lackierpistole aufgetragen.
Da es kein 2K Lack war, dauerte das Trocknen einen paar Tage. Dafür sind wir aber mit dem Ergebnis sehr zufrieden.

The control panel was another special challenge.
Originally, it was the keypad of a TRW alarm system. Today impossible to find.
But what you can find are very good reference photos.
Based on these, Markus (modellbaubert) constructed a multi-part CAD model of the housing, which was refined again and again over many weeks until it finally fit.
Another problem were the colored keys. These were also not available. So we made CAD models for these as well.
Our friends Janos and Johannes then printed the parts for us on a resin printer.
The prints are great! Even the finest details were reproduced.
We then wet sanded the whole thing a bit and painted it with the appropriate color.
Of course, there was no suitable spray paint can, so we had the paint mixed, thinned it a bit and applied it with the paint gun.
Since it was not a 2K paint, it took a few days to dry. But we are very happy with the result.
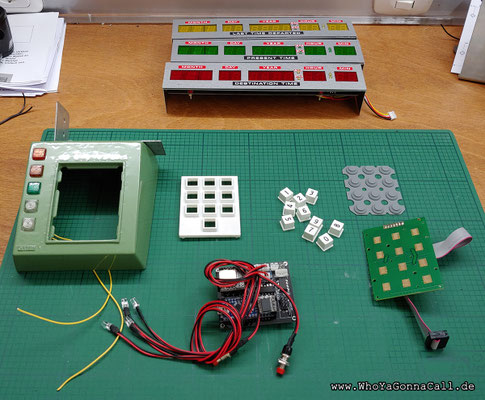
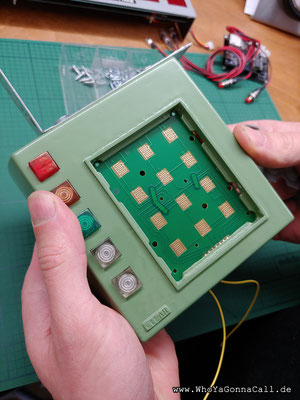


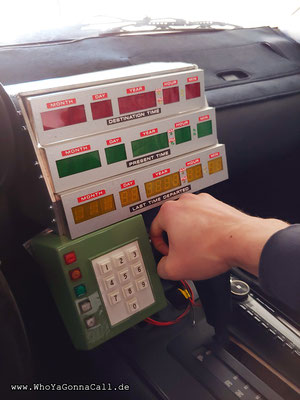
Zum Schluss fügten wir alle Teile zusammen.
Kathy (shinzo) lötete noch die Vorwiderstände für die LEDs in den Eigenbau-Tasten ein und wir versahen den Mikro-Controller noch mit einer 5V Spannungsreglung, damit wir alles
bedenkenlos ans Auto-Bordnetz anschließen konnten.
Vielen lieben Dank nochmal an unsere tollen Helfer im Hintergrund:
Sven S., Janos, Johannes und Andreas
Jetzt können wir unsere Zeitmaschine bedienen :-)

Finally, we put all the parts together.
Kathy (shinzo) soldered the resistors for the LEDs in the self-made buttons and we provided the micro-controller with a 5V voltage regulation, so that we could connect everything to the
car's electrical system without hesitation.
Again a big thank you to our helpers:
Sven S., Janos, Johannes and Andreas
Now we can operate our time machine :-)


Enjoy our Time Circuit Display making of video:


Kommentar schreiben