
STAR WARS - Lightsaber Luke RotJ


Luke Ep6 Hero-Laserschwert
Einige Jahre nach der Fertigstellung meiner anderen beiden Luke-Schwerter (ANH und ESB) aus alten Graflex-Blitzen, wurde es Zeit für was Neues.
Ich beschloss die Reihe mit dem Schwert aus Episode 6 zu vollenden.
Dazu musste ich erstmal genauestens recherchieren, wie das Teil überhaupt aussah.
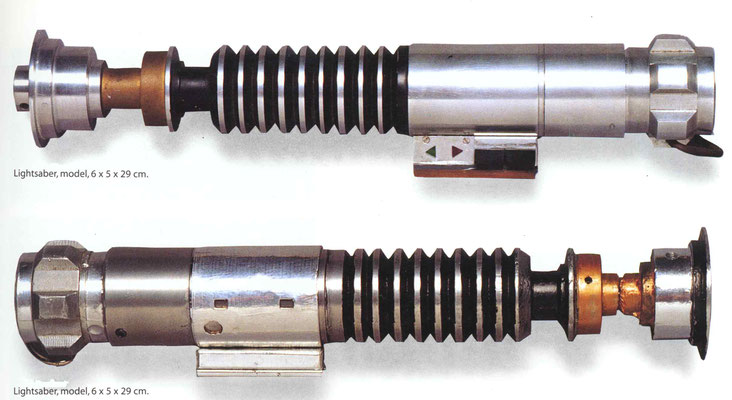
Für den Film wurden damals 2 verschiedene Griffe gemacht. Ein Stunt- und ein Hero-Griff.
Das ist bei Hollywood-Filmen ein gängiges Verfahren. So gab es z.B. auch Stunt-Hoverboards bei Zurück in die Zukunft. Die waren ohne viel Schnickschnack, hielten dafür aber auch mehr aus.
Aber für Nahaufnahmen benutzt man dann immer die Hero-Requisiten.
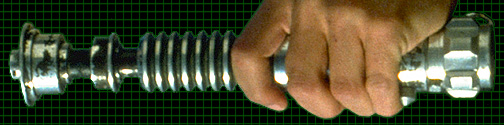
Es ist sicher klar, dass für mich nur der Hero-Griff in Frage kommt :-)
Zumal dieser auch dem Schwert von Obi-Wan stark ähnelt, was ich persönlich für das schönste aller Laserschwerter halte ;-)
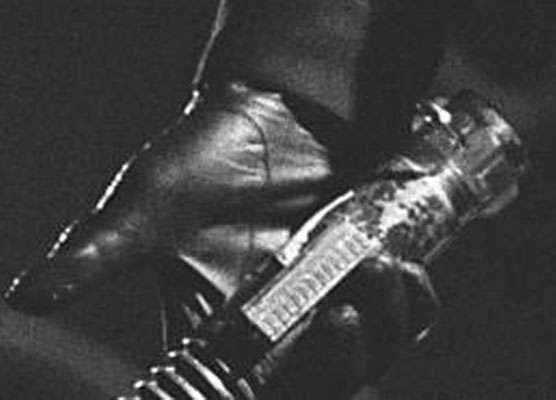
Als erstes suchte ich mir einige schöne HD-Screenshots von Episode 6 heraus und nutzte diese als Vorlage für erste Skizzen.
Außerdem gab es noch zahlreiche Fans vor mir, die das Schwert ebenfalls gebaut haben. Auch diese Fotos dienten mir als Referenz.
Allerdings fand ich den Griff noch nicht so richtig ansprechend. Somit entschied ich mich dazu das Design leicht zu verändern. Das ist der große Vorteil, wenn man alles selbst baut. Man kann
variieren :-)
Letztendlich wurde es ein Griff mit der Geometrie der Hero-Variante und einem verbesserten Finish/Lackierung/Patina der Stunt-Version.

Luke Ep6 Hero-Lightsaber
Several years after completing my other two Luke-Lightsabers (ANH and ESB) from old Graflex flashes, it was time for something new.
I decided to complete the series with the sword from episode 6.
For this I first had to research carefully how the saber looked at all.
At that time two different handles were made for the film. A stunt and a hero grip.
This is a common procedure in Hollywood films. So there was e.g. also stunt hoverboards at Back to the Future. They were without much frills, but they are more durable.
But for close-ups they always use the Hero props.
It was no question, that I only wanted to build the hero-version :-)
Especially since this also strongly resembles the sword of Obi-Wan, which I personally consider the most beautiful of all lightsabers ;-)
First, I picked out some nice HD screenshots of Episode 6 and used them as a template for the first sketches.
In addition, there were still many fans in the past who also built this saber. These photos were also my reference.
However, the saber didn't look exactly like I wanted it to look like. So I decided to change the design slightly. That's the big advantage of building everything yourself. You can vary :-)
Ultimately it became a handle with the geometry of the Hero variant and an improved finish / paint / patina of the stunt version.

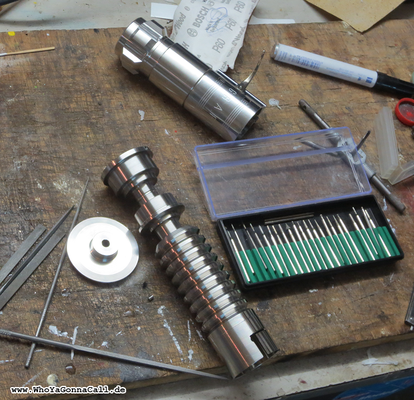
Jetzt war es mir möglich ein außerordentlich detailliertes 3D-CAD-Modell des Schwertes zu erschaffen.
Das 3D-Modell war Basis für meinen Zeichnungs-Satz.

Now I was able to create a very detailed CAD-model of the saber. This 3D-model was the basis for my drafts.
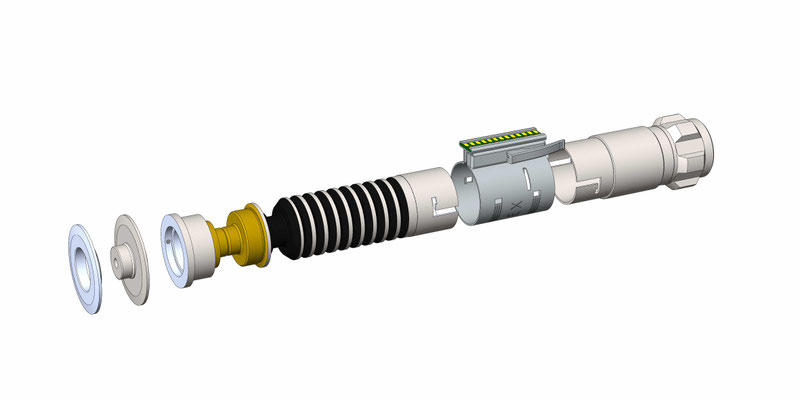

Natürlich brauche ich im Inneren des Griffs so viel Platz wie nur irgend möglich.
Also plante ich recht dünne Wandstärken ein. Somit müsste es mir möglich sein, eine anständige Stromversorgung und Elektronik unterzubringen.
Zum Werkstoff muss ich sagen, dass Aluminium zwar schön leicht ist, es aber dennoch seine Schwächen hat:
Es ist nicht sehr fest und auch recht weich, weshalb es schnell Kratzer und Dellen bekommt.
Außerdem oxidiert es schnell, wodurch es schnell seinen Glanz verliert.
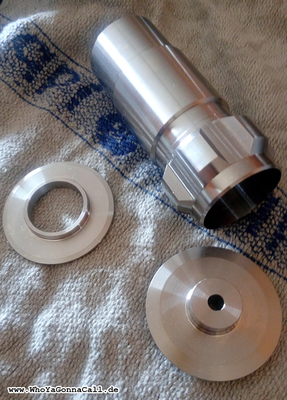
Also entschied ich mich für eine Version aus Edelstahl. Dadurch wird der Griff zwar etwas schwerer,
dafür aber sieht er in 100 Jahren noch aus wie neu :-)
Ein Bekannter von mir konnte nach meinen Zeichnungen die Rohteile auf der CNC-Maschine für mich anfertigen.

Of course I need as much space inside the handle as possible.
So I planned quite thin wall thicknesses. Thus, I should be able to accommodate a decent power supply and electronics.
As far as the material is concerned, I have to say that, while aluminum is pretty light, it still has its weaknesses:
It is not very firm and also quite soft, which is why it quickly gets scratches and dents.
It also oxidizes quickly. So it's losing its shine very quick.
So I decided on a stainless steel version. This makes the handle a bit heavier but even in 100 years it will look like it was new :-)
An acquaintance of mine was able to make the blanks on the CNC machine for me according to my blueprints.

Durch Zufall hatte damals zeitgleich ein Elektronik-Bastel-Genie (András Kun aka Protonerd) an einer Arduino-basierten Elektronik speziell für Laserschwerter geforscht. (DIYino)
Schnell kamen wir in Kontakt und tauschten uns über lange Mails miteinander über Laserschwerter, Blaster & Co aus.
Als er dann soweit war, schickte er mir zwei seiner ersten selbst-entwickelten Platinen.

By chance, at the very same time, an electronics craft genius named Andràs Kun (Protonerd) had been researching on an Arduino-based electronics especially for lightsabers. (DIYino)
Quickly we came in contact and exchanged over long Mails with each other over lightsabers, Blaster & Co.
When he was ready, he sent me two of his first self-developed boards.
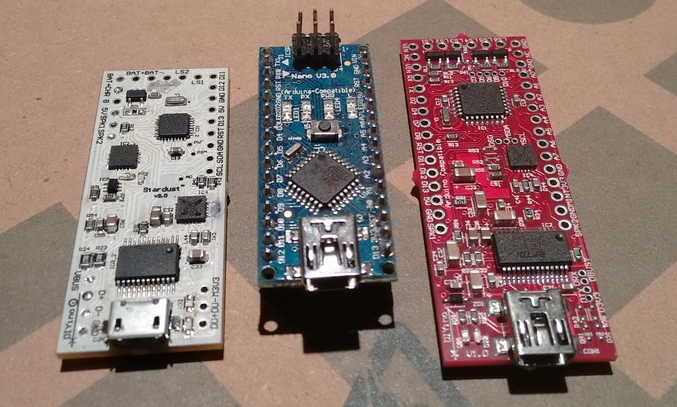

Da ich mich mit dem Programmieren von Microcontrollern nicht auskenne, und mir auch nicht die Zeit nehmen möchte dies zu lernen, brauchte ich Hilfe.
Mein Freund Christopher erklärte sich bereit mir zu helfen.
So schrieb er zunächst eine Software für eine Klinge aus sog. Neopixeln. Das sind LED-Stränge mit einer Reihe RGB-LEDs die jeweils über ein eigenes BUS-System verfügen.
Dies ermöglicht das Ansteuern jeder beliebigen LED des Stranges mit nur einer Datenleitung.
Mann kann also jeden erdenklichen Lichteffekt scripten.
Leider haben die Pixel mehrere Nachteile: Sie sind teuer, nicht besonders hell, fressen viel Strom und benötigen stabile 5V. Außerdem ist das BUS-System recht langsam.
Die 5V zu bekommen war eines der Haupt-Probleme. Denn diese sollten 5V bei ca. 14A liefern. Das ging nur mit einem Schaltregler. Einen zu finden, der im Griff neben der Elektronik Platz hat, war
nicht einfach.
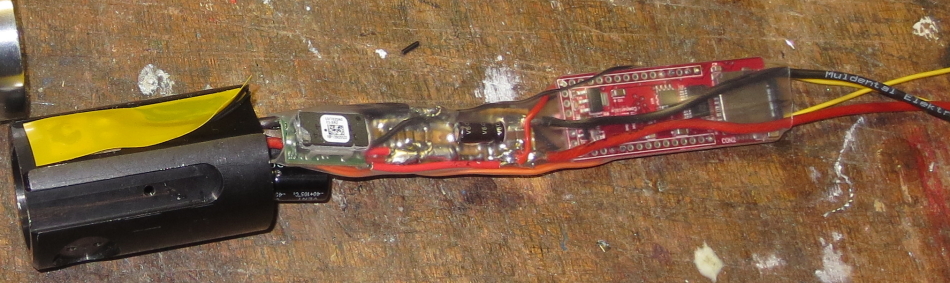
Nach einigen Wochen der Suche fand ich jedoch, wonach wir suchten und Christopher lötete mir eine Ansteuer-Elektronik für das Teil.

Since I do not know how to program microcontrollers, and I do not want to take the time to learn this, I needed help.
My friend Christopher agreed to help me.
So he first wrote a software for a blade of so-called Neopixels. These are LED strings with a row of RGB LEDs, each with its own BUS system.
This allows driving any LED of the string with only one data line.
So you're able to script every conceivable light effect.
Unfortunately, the pixels have several disadvantages: they are expensive, not very bright, eat a lot of power and require stablized 5V. In addition, the BUS system is quite slow.
Getting the 5V was one of the main problems. Because these should deliver 5V at about 14A. That was only possible with a power-regulator. Finding one which was tiny enough to fit into my grip
with all the rest of electronics including the batteries wasn't that easy.
After a few weeks of searching, however, I found what we were looking for and Christopher soldered me a driving electronics for the part.

Der erste Test jedoch war ernüchternd: Viel zu langsam und bei weitem nicht hell genug. Und das obwohl wirklich viel Strom verbraucht wurde.
Somit starben die Neopixel für dieses Projekt.

The first test was quiet sobering: The effect was much too slow and far of being bright enough. And this even though much energy was needed.
So the Neopixels died for this project.


Also ging ich einen Schritt zurück zu meiner alten, selbstentwickelten Klingen-Methode: Dem LED Strang.
Natürlich habe ich den LED-Strang nicht erfunden, jedoch habe ich ihn selbst soweit optimiert, dass ich noch kein helleres Schwert gesehen habe. :-)
Der Strang habe ich so zusammengebaut, dass er 6 voneinander unabhängig ansteuerbare Segmente besitzt.
Für den LED-Strang musste natürlich eine neue Software geschrieben werden.
Freundlicherweise hat mir Christopher dann die bereits geschriebene Neo-Pixel-Laserschwert-Software entsprechend umgeschrieben.
Das Programm ist jetzt wie folgt aufgebaut: Es fragt alle 1/30 Sekunde (Framerate des Films) eine Zeile mit 6 Werten ab. Dabei steht jeder einzelne Wert für die Helligkeit des jeweiligen Segments.
Die Anzahl der Zeilen ist ebenfalls Variabel, sodass Licht-Sequenzen von mehreren Sekunden möglich sind.
Nun habe ich die Szene als Luke sein Schwert von Obi Wan erhält in Einzelbilder aufgesplittet.
Auf 96 Einzelbildern konnte man die Klinge gut erkennen. Nun habe ich die Klinge in jedem Einzel-Frame freigestellt (ausgeschnitten) und als Bilder-Serie nebeneinander gelegt.
In einer Excel-Tabelle habe ich dann alle optisch wahrgenommenen Helligkeiten für jedes Klingensegment aufgeschrieben.

So I took a step back to my old, self-developed blade method: the LED string.
Of course, I did not invent the LED string, but I optimized it myself so far that I have not seen a brighter blade yet :-)
I soldered the string so that it has 6 independently controllable segments.
Of course, new software had to be written for the LED string.
Christopher then kindly rewritten the neo-pixel software.
The program is now structured as follows: It queries a line with 6 values every 1/30 second (frame rate of the movie).
Each individual value represents the brightness of the respective
segment.
The number of lines is also variable, so that light sequences of several seconds are possible.
Now I have the scene when Luke receives his sword from Obi Wan split into frames.
The blade was clearly recognizable on 96 single images. Now I have cut out the blade in each individual frame and placed it side by side as a series of pictures.
I then typed all the visually perceived brightness into an Excel spreadsheet.


Knifflig war dann noch die Werte in die Entsprechende LED-Ströme umzurechnen, da dieser Zusammenhang leider nicht linear ist.
Aber nach zahlreichen Versuchen hatte ichs dann endlich und nun habe ich eine nahezu 100%ige Kopie des Film-Flackerns aus Episode 4!!
Nach all den Jahren endlich am Ziel :-D
An dieser Stelle möchte ich mich nochmal recht herzlich bei all meinen Freunden bedanken, die mich während des Projekts unterstützt haben.
Ganz besonderer Dank gilt dabei meinem Freund Tigga, der es in wochenlanger Arbeit geschafft hat, mir das Programm zu schreiben, das ich so lange wollte und auch viel Arbeit in die Neopixel gesteckt hat. (Sorry dass das umsonst war xD)
Dann wäre noch mein Kollege Daniel, der sich intensiv mit dem Schaltregler für die 5V der Neopixel beschäftigt hat.
Mein Freund Kudi, der mir vor über 10Jahren in der Anfangszeit des Projekts bei den ersten Schritten half.
Dem Arduino-Genie András, der das geniale DIYIno entwickelt hat und mir mit Rat und Tat zur Seite stand.
Meiner Freundin Kathy, die all die Jahre immer ein offenes Ohr für dieses Projekt hatte.
Und nicht zuletzt all den Star Wars-Freaks, die in all den letzten 40 Jahren Prop-Fotos, Screenshots, Maße usw. recherchiert und veröffentlicht haben. Ohne Euch wäre dieses Projekt kaum möglich gewesen! VIELEN DANK :-)
- modellbaubert

A little bit tricky was to calculate the program-settings to the correct LED-current. There is no linear correlation.
After many, many tries I finally got a almost 100% copie of the movie-flickering at episode 4.
After all these years, I finally reached this goal.
At this point I would like to thank all of my friends who supported me during the project.
Special thanks go to my friend Tigga, who managed to write the program for weeks that I wanted for so long and also put a lot of work into the Neopixel. (Sorry that it was in vain xD)
Then there's my colleague Daniel, who worked intensively on the power-regulator for the 5V of the Neopixel.
My friend Kudi, who helped me with the first steps over 10 years ago when the project started.
The Arduino genius András, who developed the ingenious DIYIno and assisted me with advice and action.
My friend Kathy, who has always listened to my thoughts in this project over the years.
And last but not least, all the Star Wars freaks who have researched and published prop photos, screenshots, dimensions, etc. over the past 40 years. This project would hardly have been possible
without you! THANKS A LOT :-)
- modellbaubert


Kommentar schreiben
Stefan (Samstag, 13 Januar 2024 21:00)
Servus,
sehr cooles Lichtschwert. Ein paar Bilder vom Inneren der Klinge wären noch spannend...
Gruß Stefan